


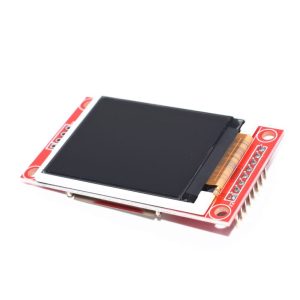
1.8 inch TFT LCD Module SPI Serial 128 x 160
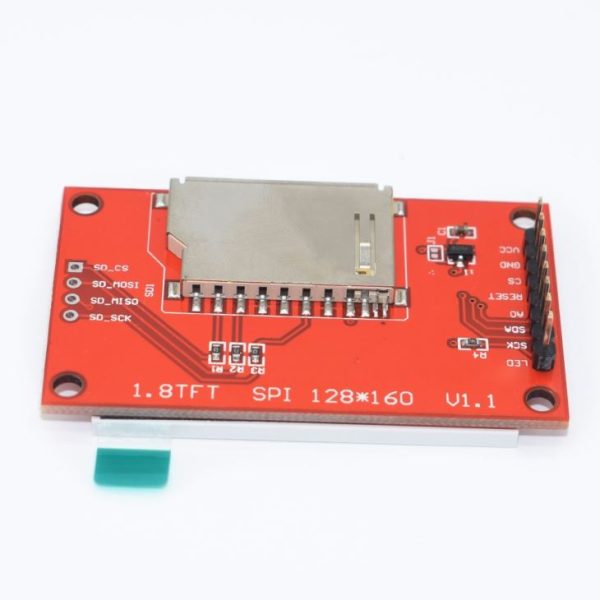
High-quality SPI serial, less I/O port need Controller: ST7735S PCB adapter for LCD One SD card socket Can be driver by 8051 / AVR / PIC. Military-grade process standards, long-term stable work.
2 in stock
2 in stock


1.8 inch TFT LCD Module SPI Serial 128 x 160 is a compact, colourful display that works well with Raspberry Pi, Android and other microcontrollers.
The display module is bight, anti-reflective and offers the choice of loading images via SD card through the slot on the back of the screen or via a microcontroller.
16-BIT RGB 65K colour display, and the internal driver IC is ST7735S, which uses 4-wire SPI communication. The module contains an LCD and a PCB control backplane.
Specifications:
- Display colour: 16BIT RGB 65K colour
- Size: 1.8(inch)
- Type: TFT
- Resolution: 128*160 (Pixel)
- Module interface: 4-wire SPI interface
- SPI serial, less I/O port need
- Backlight: 2 White Led
- Effective display area: 28.03×35.04 (mm)
- Module PCB size: 38.30×62.48 (mm)
- Working temperature: -10℃~60℃
- Storage temperature: -20℃~70℃
- Working voltage: 5V/3.3V
- Power consumption: about 90mw
- Controller: ST7735S
- One sd card socket
- Can be driverd by 8051 / AVR / PIC /ARM/STM32…
Package included: 1x 1.8 inch TFT LCD Module SPI Serial 128 x 160
Check out our On Sale and Clearance Items
Development Resources: demo codes, schematics, datasheets, etc
Product Documentation
- 1.8-inch Arduino SPI Module User Manual
- 1.8-inch Arduino SPI Module Size Picture
- TFT Specifications 1.8 inch
- 1.8-inch Arduino SPI Module Schematic
- 1.8 inch QDTFT1801 TFT LCD Schematic and PCB Package Library
- Driver IC ST7735S Datasheet
YouTube Video on how to Connect your LCD Screen to Arduino
Connect to Arduino with 1.8 inch TFT LCD Module SPI Serial 51 128 x 160

Step 1:
- Download the test program
- Download the Arduino test program from the Program Download column
- For a description of the relevant test procedures, please refer to the test program documentation in the package
Step 2:
- Connect the Arduino development board
- Plug the module directly into the Arduino development board ( Do not plug in?)
- After the module is plugged in, power on the Arduino board
Step 3:
- Copy the dependent library
- Make sure the Arduino IDE is installed on your computer.
- After installing the Arduino IDE, you need to copy the dependent library to the Arduino project directory as follows:
- (1) Decompress the downloaded test package
- (2) Copy the dependent libraries in the Install libraries directory in the package (shown below) to the libraries folder of the Arduino project directory ( Don’t know the Arduino project directory?)
Step 4:
- Compile and download the program to the development board
- Open the sample in the Example directory of the package to test, compile and download( don’t know how to compile and download? )
Step 5:
- Observe the running of the program.
![]() Hackaday serves up Fresh Hacks Every Day from around the Internet.
Hackaday serves up Fresh Hacks Every Day from around the Internet.
![]()
Instructables is a community for people who like to make things. Explore, share, and do your next project with us!
![]() Where the world builds software
Where the world builds software
![]() Raspberry Pi Foundation What would you like to make today?
Raspberry Pi Foundation What would you like to make today?
![]() Arduino‘s mission is to enable anyone to enhance their lives through accessible electronics and digital technologies.
Arduino‘s mission is to enable anyone to enhance their lives through accessible electronics and digital technologies.
![]()
Wikipedia is a free online encyclopedia created and edited by volunteers worldwide and hosted by the Wikimedia Foundation.
Notes:
1. There may be slight size deviations due to manual measurement, different measuring methods and tools.
2. The picture may not reflect the actual colour of the item because of different photographing light, angles and display monitors.
| Weight | 0.065 kg |
|---|---|
| Dimensions | 7.5 × 5.2 × 1 cm |
Product Applications
Works well with Raspberry Pi, Android and other microcontrollers. The display module is bight, anti-reflective and offers the choice of loading images via SD card through the slot on the back of the screen or via a microcontroller.
Q & A
Related Products

Nextion NX8048T050 5 inch
$119.95


